iOS 电量优化
1. CPU 优化
1.1 CPU 使用率与功耗
CPU 使用率与功耗成正比关系。CPU 使用率越高,功耗越大。
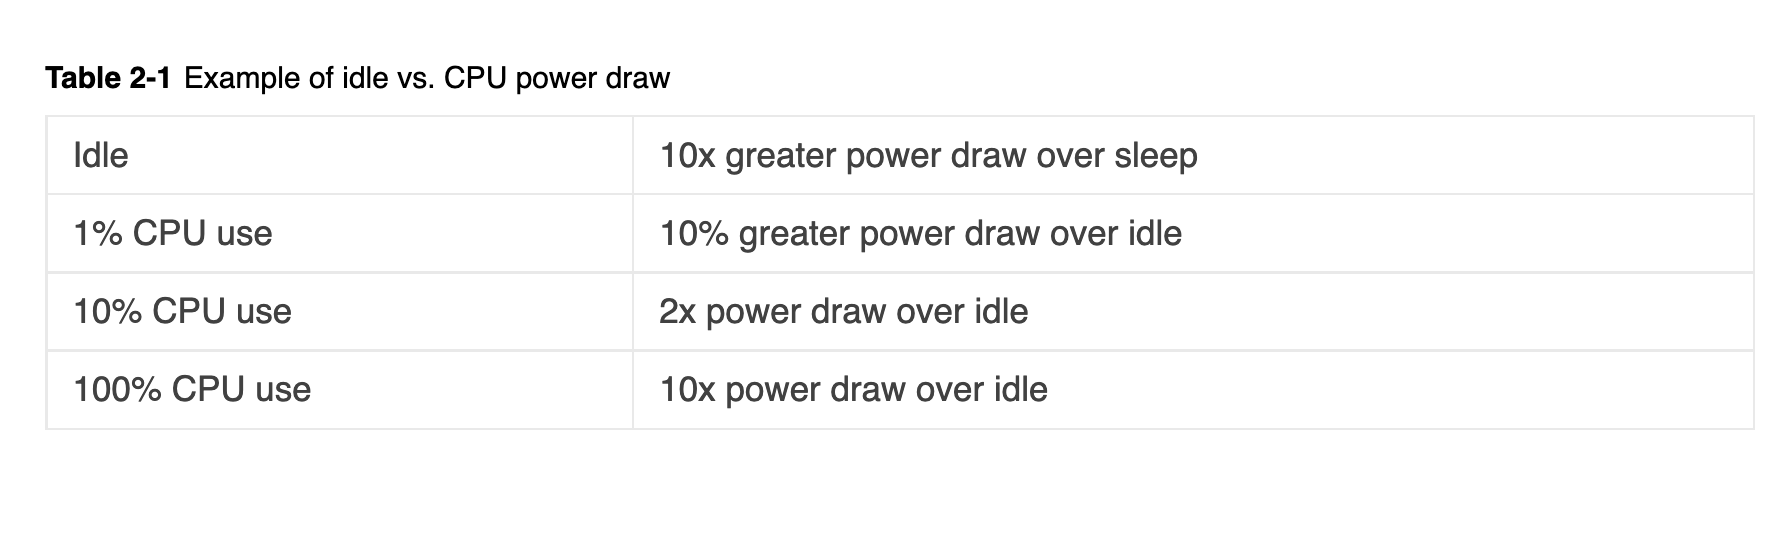
| 状态 | 功耗倍数 |
|---|---|
| Sleep | 1 |
| Idle | 10 = 1(sleep) × 10 |
| 1% CPU 使用 | 11 = 10(idle) × 1.1 |
| 10% CPU 使用 | 20 = 10(idle) × 2 |
| 100% CPU 使用 | 100 = 10(idle) × 10 |
1.2 后台任务优化
后台需要长时间运行的任务,应该通过系统 API 申请后台执行时间。
使用后台任务标识符:
UIBackgroundTaskIdentifier bgTaskID = [[UIApplication sharedApplication] beginBackgroundTaskWithExpirationHandler:^{
    // 超时处理回调
}];

// 执行后台任务
// ...

// 任务完成后通知系统
[[UIApplication sharedApplication] endBackgroundTask:bgTaskID];
注意事项:
- 超出后台任务时间限制的后台任务,会触发 CPU 使用率过高的崩溃
- 崩溃信息示例:
Exception Type: EXC_RESOURCE

  Exception Subtype: CPU_FATAL

  Exception Message: (Limit 80%) Observed 89% over 60 seconds
1.3 调整任务的 QoS 级别
通过设置合适的 Quality of Service (QoS) 级别,可以让系统更好地管理任务优先级和资源分配,从而降低功耗。
NSOperation 设置 QoS:
// NSOperation
NSOperation *myOperation = [[NSOperation alloc] init];
myOperation.qualityOfService = NSQualityOfServiceUtility;

// NSOperationQueue
NSOperationQueue *queue = [NSOperationQueue new];
queue.qualityOfService = NSQualityOfServiceUtility;
GCD Queue 设置 QoS:
// GCD queue
dispatch_queue_attr_t qosAttribute = dispatch_queue_attr_make_with_qos_class(
    DISPATCH_QUEUE_CONCURRENT,
    QOS_CLASS_UTILITY,
    0
);
dispatch_queue_t myQueue = dispatch_queue_create("com.YourApp.YourQueue", qosAttribute);

// dispatch_block_t
dispatch_block_t myBlock;
myBlock = dispatch_block_create_with_qos_class(0, QOS_CLASS_UTILITY, -8, ^{
    // ...
});
dispatch_async(myQueue, myBlock);
pthread 设置 QoS:
// pthread
pthread_attr_t qosAttribute;
pthread_attr_init(&qosAttribute);
pthread_attr_set_qos_class_np(&qosAttribute, QOS_CLASS_UTILITY, 0);
pthread_create(&thread, &qosAttribute, f, NULL);

// 修改线程的 QoS
pthread_set_qos_class_self_np(QOS_CLASS_BACKGROUND, 0);
1.4 减少定时器的使用
定时器会持续唤醒 CPU,增加功耗。优化建议:
- 使用事件通知替代定时器
- 使用 GCD 进行同步操作
- 设置合理的超时时间
- 不需要定时器时及时重置定时器
- 设置定时器精度(tolerance)
NSTimer 设置精度:
[myTimer setTolerance:0.3];
[[NSRunLoop currentRunLoop] addTimer:myTimer forMode:NSDefaultRunLoopMode];
dispatch_source_timer:
dispatch_source_t myDispatchSourceTimer = dispatch_source_create(
    DISPATCH_SOURCE_TYPE_TIMER,
    0,
    0,
    myQueue
);
dispatch_source_set_timer(
    myDispatchSourceTimer,
    DISPATCH_TIME_NOW,
    1 * NSEC_PER_SEC,
    NSEC_PER_SEC / 10
);
dispatch_source_set_event_handler(myDispatchSourceTimer, ^{
    [self timerFired];
});
dispatch_resume(myDispatchSourceTimer);
CFRunLoopTimerRef:
CFRunLoopTimerRef myRunLoopTimer = CFRunLoopTimerCreate(
    kCFAllocatorDefault,
    fireDate,
    2.0,
    0,
    &timerFired,
    NULL
);
CFRunLoopTimerSetTolerance(myRunLoopTimer, 0.2);
CFRunLoopAddTimer(CFRunLoopGetCurrent(), myRunLoopTimer, kCFRunLoopDefaultMode);
1.5 减少 IO 操作
IO 操作会消耗大量电量,优化建议:
- 减少数据量的写入
- 避免频繁写内存
- 尽量按顺序读写数据
- 使用
dispatch_io进行数据读写 - 了解系统的缓存机制
1.6 处理低电量模式
iOS 提供了低电量模式(Low Power Mode)的检测和通知机制,应用应该响应低电量模式,减少不必要的操作。
监听低电量模式通知:
// 监听通知
[[NSNotificationCenter defaultCenter] addObserver:self
    selector:@selector(yourMethodName:)
    name:NSProcessInfoPowerStateDidChangeNotification
    object:nil];
查询低电量模式状态:
if ([[NSProcessInfo processInfo] isLowPowerModeEnabled]) {
    // 低电量模式已启用,开始减少活动以节省电量
} else {
    // 低电量模式未启用
}
1.7 处理发热状态
iOS 提供了设备发热状态的监控机制,应用应该响应发热状态,降低性能要求。
监听发热状态通知:
[[NSNotificationCenter defaultCenter] addObserver:self
    selector:@selector(thermalStateChanged:)
    name:NSProcessInfoThermalStateDidChangeNotification
    object:nil];
1.8 Energy Log – 高 CPU 监控策略
系统会根据 CPU 使用率监控应用的能耗情况,不同 iOS 版本的触发条件不同:
iOS 2018 版本:
– 前台超过 3 分钟超过 80% 的 CPU 使用
– 后台超过 1 分钟超过 80% 的 CPU 使用,应用程序会被杀死
iOS 2022 版本:
– 前台超过 3 分钟超过 80% 的 CPU 使用,提示 CPU 使用过高
– 后台超过 15 秒钟超过 60% 的 CPU 使用,应用程序会被杀死
1.9 IO 监控
原理: Hook 文件读写接口,主线程的 IO 监控只检测主线程的 IO。
监控策略:
– open 之后 30 秒或者 close 的时候上报 open 的调用堆栈
– 上报到 Bugly 等监控平台
监控接口:
| 平台 | 监控接口 |
|---|---|
| iOS | open, read, write, close |
| Android | open, read, write, close |
2. 网络优化
2.1 减少网络操作
网络操作是耗电大户,优化建议:
减少数据传输:
– 减少数据大小
– 减少媒体质量和大小
– 压缩数据
– 避免重复传输
– 缓存数据
– 使用可暂停和重启的事务
错误处理:
– 检查网络是否可用
– 设置超时
– 使用重试机制
检查网络可用性:
#import "SystemConfiguration/SCNetworkReachability.h"

// 创建可达性对象
NSString *hostName = @"someHostName";
SCNetworkReachabilityRef reachability = SCNetworkReachabilityCreateWithName(
    NULL,
    [hostName UTF8String]
);

// 创建标志位存储空间
SCNetworkReachabilityFlags flags;

// 检查主机可达性
SCNetworkReachabilityGetFlags(reachability, &flags);

// 释放可达性对象
CFRelease(reachability);

// 检查是否可达
if ((flags & kSCNetworkReachabilityFlagsReachable) == 0) {
    // 目标主机不可达
    // 提示用户或延迟活动
}
2.2 延迟网络操作
优化策略:
– 批量操作:合并多个网络请求
– 延迟网络操作:非紧急请求延迟执行
– 使用 NSURLSession:独立进程,使用事件通知,高效的网络操作,自我纠正错误
配置后台会话选项:
// 设置后台会话配置
NSURLSessionConfiguration *configuration = [NSURLSessionConfiguration
    backgroundSessionConfigurationWithIdentifier:@"com.<YourApp>.<YourBackgroundSessionIdentifier>"];

// 设置为可延迟执行
[configuration setDiscretionary:YES];

// 仅在 Wi-Fi 下执行
configuration.allowsCellularAccess = NO;

// 设置在接下来的 18 小时内执行
[configuration setTimeoutIntervalForResource:18 * 60 * 60];

// 创建 URL 会话
NSURLSession *backgroundSession = [NSURLSession sessionWithConfiguration:configuration
    delegate:self
    delegateQueue:nil];

// 设置 URL
NSURL *someURLToDownload = [NSURL URLWithString:<YourURLString>];

// 创建 URL 请求
NSURLRequest *downloadRequest = [NSURLRequest requestWithURL:someURLToDownload];

// 添加到后台会话
NSURLSessionDownloadTask *downloadTask = [backgroundSession downloadTaskWithRequest:downloadRequest];

// 启动任务
[downloadTask resume];
接收下载完成通知:
- (void)URLSession:(NSURLSession *)session
    downloadTask:(NSURLSessionDownloadTask *)downloadTask
    didFinishDownloadingToURL:(NSURL *)location {
    // 处理下载完成后的工作
}
3. 图形、动画和视频优化
3.1 避免过度的图形和动画
图形渲染和动画会消耗大量电量,优化建议:
- 减少视图的数量
- 减少透明度的使用
- 透明视图盖在频繁刷新内容的视图上面会增加渲染负担
- 避免绘制不可见的内容
- 使用低帧率动画
- 动画使用一致的帧率
- 避免屏幕上同时有多种不同的帧率
- 游戏开发使用推荐的框架
3.2 播放全屏视频时的优化
播放全屏视频时,避免显示其他 UI 元素,减少不必要的渲染。
4. 位置和传感器优化
4.1 减少位置精度和持续时间
位置服务是耗电大户,优化建议:
- 停止位置服务:不需要时及时停止
- 降低请求的位置精度:使用较低的精度要求
- 停止更新:如果位置精度不符合预期,停止更新
- 使用访问监控:使用
CLVisit监控位置访问 - 最后才使用显著位置更新:优先使用其他低功耗方案
快速位置更新示例:
- (void)viewDidLoad {
    // 创建位置管理器对象
    self.locationManager = [[CLLocationManager alloc] init];

    // 设置代理
    self.locationManager.delegate = self;
}

- (void)getQuickLocationUpdate {
    // 请求位置授权
    [self.locationManager requestWhenInUseAuthorization];

    // 请求位置更新
    [self.locationManager requestLocation];
    // 注意:如果授权尚未授予,requestLocation 可能会超时并产生错误

    // 设置精度级别,精度越高,功耗越大
    self.locationManager.desiredAccuracy = kCLLocationAccuracyThreeKilometers;

    // 启用自动暂停
    self.locationManager.pausesLocationUpdatesAutomatically = YES;

    // 指定应用当前执行的活动类型
    self.locationManager.activityType = CLActivityTypeFitness;

    // 启用后台位置更新
    self.locationManager.allowsBackgroundLocationUpdates = YES;

    // 开始位置更新
    [self.locationManager startUpdatingLocation];
}

- (void)locationManager:(CLLocationManager *)manager
    didUpdateLocations:(NSArray *)locations {
    // 处理接收到的位置更新
    [self.locationManager stopUpdatingLocation];
}
延迟位置更新示例:
- (void)locationManager:(CLLocationManager *)manager
    didUpdateLocations:(NSArray *)locations {
    // 添加新位置到行程
    [self.hike addLocations:locations];

    // 延迟更新直到用户移动一定距离或经过一段时间
    if (!self.deferringUpdates) {
        CLLocationDistance distance = self.hike.goal - self.hike.distance;
        NSTimeInterval time = [self.nextUpdate timeIntervalSinceNow];
        [self.locationManager allowDeferredLocationUpdatesUntilTraveled:distance
            timeout:time];
        self.deferringUpdates = YES;
    }
}

- (void)locationManager:(CLLocationManager *)manager
    didFinishDeferredUpdatesWithError:(NSError *)error {
    // 停止延迟更新
    self.deferringUpdates = NO;

    // 调整下一个目标
}
使用访问监控:
- (void)startVisitMonitoring {
    // 创建位置管理器对象
    self.locationManager = [[CLLocationManager alloc] init];

    // 设置代理
    self.locationManager.delegate = self;

    // 请求位置授权
    [self.locationManager requestAlwaysAuthorization];

    // 开始监控访问
    [self.locationManager startMonitoringVisits];
}

- (void)stopVisitMonitoring {
    [self.locationManager stopMonitoringVisits];
}

- (void)locationManager:(CLLocationManager *)manager
    didVisit:(CLVisit *)visit {
    // 执行基于位置的活动
    // ...
}
显著位置更新:
- (void)startSignificantChangeLocationUpdates {
    // 创建位置管理器对象
    self.locationManager = [[CLLocationManager alloc] init];

    // 设置代理
    self.locationManager.delegate = self;

    // 请求位置授权
    [self.locationManager requestAlwaysAuthorization];

    // 开始显著位置更新
    [self.locationManager startMonitoringSignificantLocationChanges];
}

- (void)locationManager:(CLLocationManager *)manager
    didUpdateLocations:(NSArray *)locations {
    // 执行基于位置的活动
    // ...

    // 不再需要时停止显著位置更新
    [self.locationManager stopMonitoringSignificantLocationChanges];
}
4.2 减少传感器更新频率
传感器更新会消耗电量,优化建议:
- 不需要时停止接收方向改变通知
- 请求低频率的传感器更新
设备方向通知:
- (void)viewDidLoad {
    // 开启加速度计
    [[UIDevice currentDevice] beginGeneratingDeviceOrientationNotifications];

    // 注册方向改变通知
    [[NSNotificationCenter defaultCenter] addObserver:self
        selector:@selector(orientationChanged:)
        name:UIDeviceOrientationDidChangeNotification
        object:nil];
}

- (void)orientationChanged:(NSNotification *)notification {
    // 响应方向改变
}

- (void)viewDidDisappear:(BOOL)animated {
    // 停止接收方向改变通知
    [[NSNotificationCenter defaultCenter] removeObserver:self];

    // 关闭加速度计
    [[UIDevice currentDevice] endGeneratingDeviceOrientationNotifications];
}
加速度计更新:
- (void)viewDidLoad {
    [super viewDidLoad];

    // 创建 Core Motion 管理器对象
    self.motionManager = [[CMMotionManager alloc] init];
}

- (void)startAccelerometerUpdates {
    // 检查加速度计是否可用
    if ([self.motionManager isAccelerometerAvailable] == YES) {
        // 更新更新间隔
        [self.motionManager setAccelerometerUpdateInterval:updateInterval];

        // 开始加速度计更新
        [self.motionManager startAccelerometerUpdatesToQueue:[NSOperationQueue mainQueue]
            withHandler:^(CMAccelerometerData *accelerometerData, NSError *error) {
                // 处理加速度计数据
            }];
    }
}

- (void)stopUpdates {
    // 检查加速度计是否活跃
    if ([self.motionManager isAccelerometerActive] == YES) {
        // 停止加速度计更新
        [self.motionManager stopAccelerometerUpdates];
    }
}
5. 通知优化
- 尽量使用本地通知:本地通知比远程通知更省电
- 区分远程通知的优先级:根据重要性设置不同的优先级
6. 减少外部设备交互
6.1 蓝牙最佳实践
蓝牙通信会消耗大量电量,优化建议:
扫描设备:
– 只有需要时才扫描设备
– 最小化处理重复设备发现消息:scanForPeripheralsWithServices:options: 方法不要设置 CBCentralManagerScanOptionAllowDuplicatesKey 选项
– 只发现需要的服务和特性
– 使用通知而不是轮询去发现特性的变化
– 不需要时断开设备
扫描设备示例:
- (void)beginScanningForDevice {
    // 创建 Core Bluetooth 中央管理器对象
    self.myCentralManager = [[CBCentralManager alloc] initWithDelegate:self
        queue:nil
        options:nil];

    // 扫描外设
    [self.myCentralManager scanForPeripheralsWithServices:nil options:nil];
}

- (void)centralManager:(CBCentralManager *)central
    didDiscoverPeripheral:(CBPeripheral *)peripheral
    advertisementData:(NSDictionary *)advertisementData
    RSSI:(NSNumber *)RSSI {
    // 连接到新发现的设备
    // ...

    // 停止扫描设备
    [self.myCentralManager stopScan];
}
发现服务和特性:
// 查找匹配特定 UUID 集合的服务
[peripheral discoverServices:@[firstServiceUUID, secondServiceUUID]];

// 查找给定服务中匹配特定 UUID 集合的特性
[peripheral discoverCharacteristics:@[firstCharacteristicUUID, secondCharacteristicUUID]
    forService:interestingService];
订阅特性值:
- (void)subscribeToCharacteristic {
    // 订阅特性值
    [self.peripheral setNotifyValue:YES forCharacteristic:interestingCharacteristic];
}

- (void)peripheral:(CBPeripheral *)peripheral
    didUpdateNotificationStateForCharacteristic:(CBCharacteristic *)characteristic
    error:(NSError *)error {
    // 处理特性值更新
}

// 不需要时断开设备
// 取消订阅特性值
[self.peripheral setNotifyValue:NO forCharacteristic:interestingCharacteristic];

// 断开设备连接
[self.myCentralManager cancelPeripheralConnection:peripheral];
7. 能耗监控
7.1 能耗过度使用的信号
以下信号可能表明应用能耗过高:
- 电池耗竭:设备电量快速下降
- 期待应用空闲状态,但还是处于活跃状态
- 没有响应或者很慢的用户接口
- 主线程存在大量的任务
- 大量使用动画
- 大量使用透明度
- 内存交换:内存和缓存失效,内存告警
- 锁竞争:线程间竞争激烈
- 过度的上下文切换
- 过度使用定时器
- 过度的屏幕绘制
- 过度或者重复的少量 IO
- 高负载的通信
- 设备无法进入休眠状态
7.2 监控方法
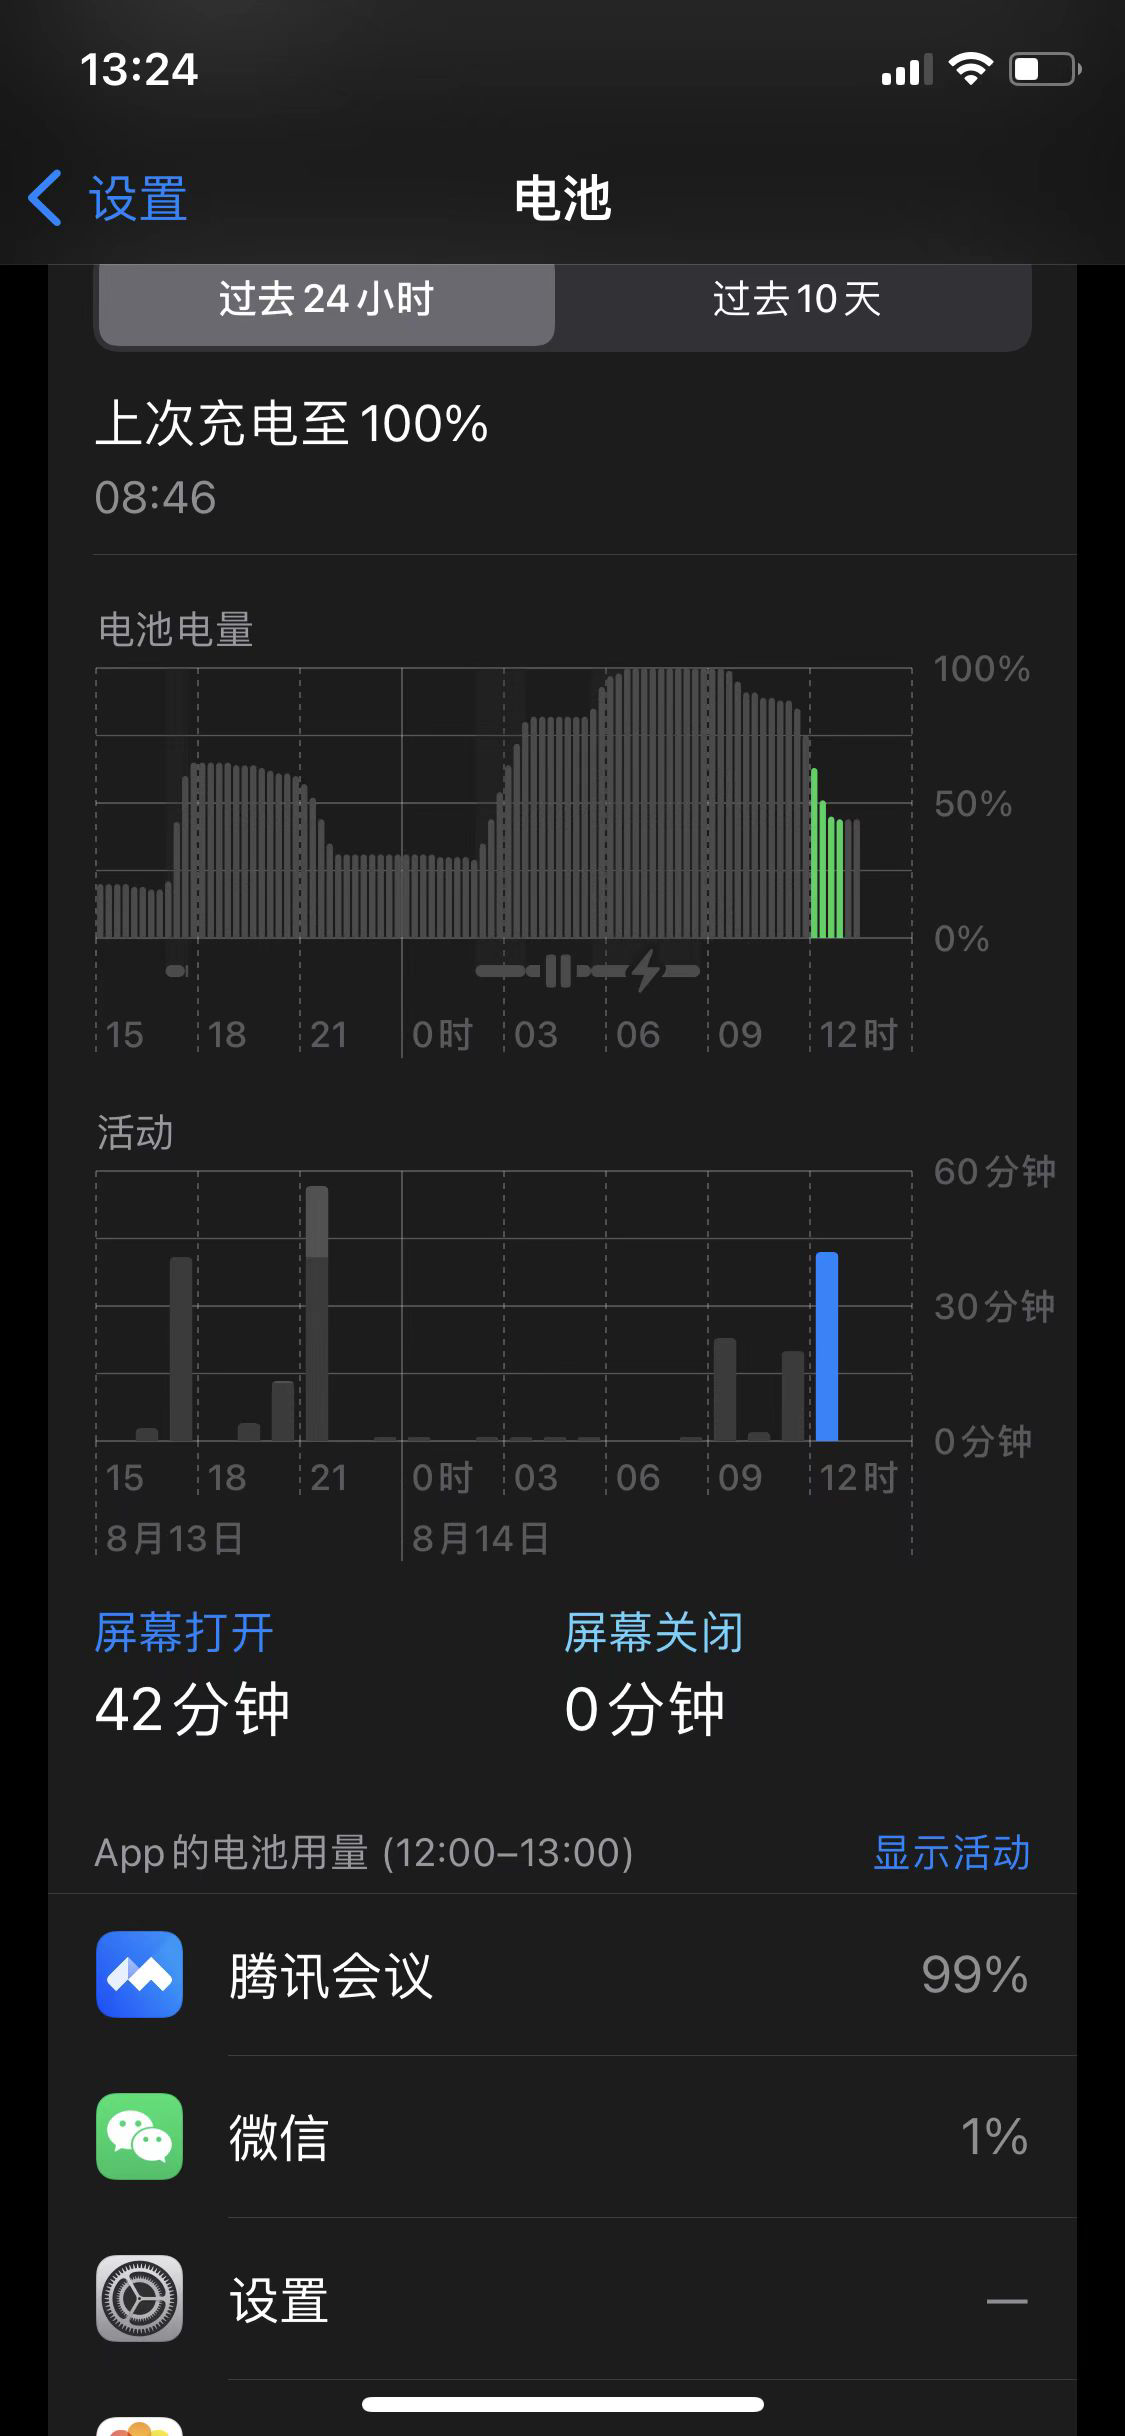
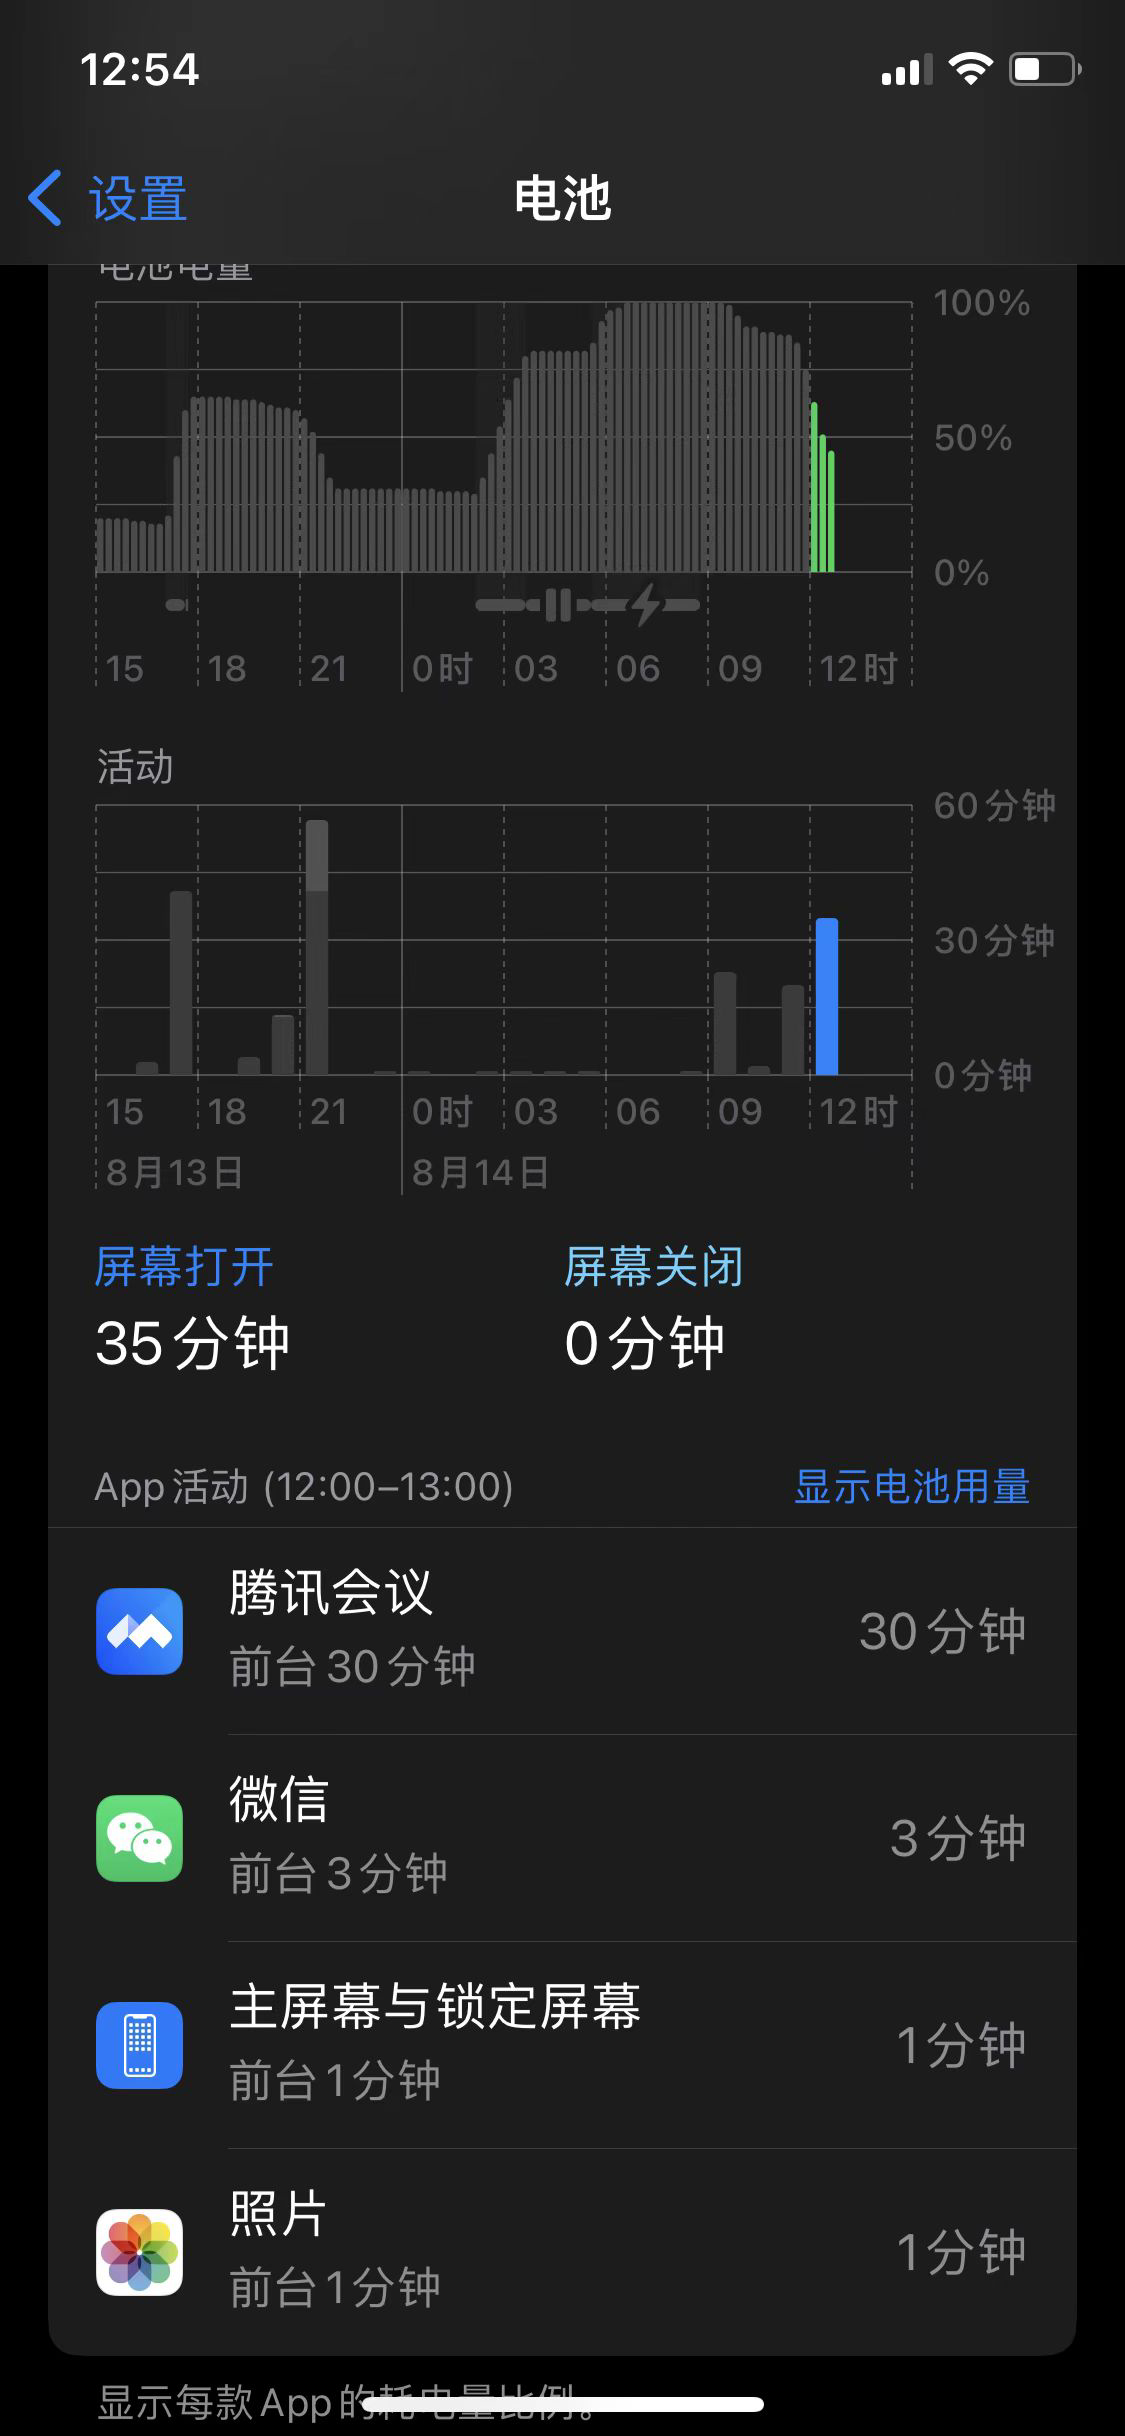
方法 1:手机设置 -> 电池
- 显示电池用量:4 格表示一个小时,只能通过图形比例去计算耗电量
- 显示活动:可以看到 App 的活动时间,包括前后台时间
方法 2:调试仪表盘 Xcode -> Energy Impact
可以显示各个组件的能耗分布占比。

方法 3:设置 -> 开发者选项 -> Logging -> Energy(新版本已经没有这个选项)
日志导出方法:Instruments -> Energy Log -> Import Logged Data From Device
方法 4:Instruments -> Energy Log(新版本已经没有这个选项)
8. 优化建议
8.1 性能优化
- 降频和降压:降频和降压直接和功耗相关,应用不需要那么高的 CPU
- 处理器差异:同种处理器,不同手机的降频策略是不一样的
8.2 代码优化
- 避免使用 NSDateFormatter:NSDateFormatter 创建和解析开销较大
- 少用运算获得圆角:使用
CALayer的cornerRadius属性,避免使用UIBezierPath绘制圆角 - 避免庞大的 xib:xib 文件过大会影响加载和渲染性能
8.3 能耗调试新特性
- 监控手机的低电量模式
- 监控手机的发热状态
9. 其他
9.1 iOS 后台程序
iOS 系统后台进程及其功耗占比:
| 进程 | 功耗占比 | 描述 |
|---|---|---|
| backboardd | 7.4% | 处理输入和进程管理 |
| DTServiceHub | 4.1% | 开发工具服务 |
| mediaserverd | 17.0% | 提供音视频功能 |
| sysmond | 17.4% | 系统监控进程 |
参考资料
- 《iOS 电量检测和优化》